سعر MidasProtocolMAS
معلومات عن سوق MidasProtocol
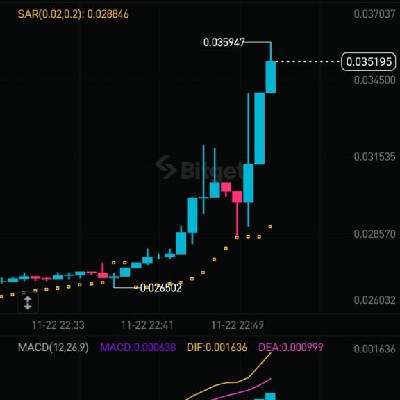
سعر MidasProtocol الحالي اليوم بعملة AED
والآن بعد أن عرفت سعر عملة MidasProtocol اليوم، إليك ما يمكنك استكشافه أيضًا:
طريقة شراء عملة مشفرةكيفية بيع العملات المشفرةتعريف MidasProtocol (MAS)ما أسعار العملات المشفرة المماثلة اليوم؟هل تريد الحصول على العملات المشفرة على الفور؟
اشترِ العملات المشفرة مباشرةً باستخدام بطاقة ائتمان.تداول مجموعة متنوعة من العملات المشفرة على منصة التداول الفوري للمراجحة.توقعات سعر MidasProtocol
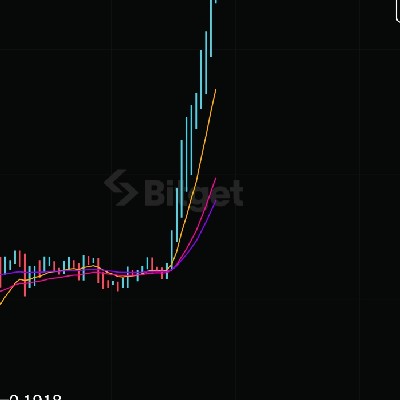
ماذا سيكون سعر MAS في 2026؟
في 2026، بناءً على توقعات معدّل النمو السنوي بنسبة +5%، من المتوقع أن يصل سعر MidasProtocol(MAS) إلى د.إ0.00؛ وعلى أساس السعر المتوقع لهذا العام، سيصل عائد الاستثمار التراكمي على استثمار MidasProtocol والاحتفاظ بها حتى نهاية 2026 إلى +5%. لمزيدٍ من التفاصيل، يُرجى الاطلاع على MidasProtocol توقعات أسعار لعملتي 2025 و2026، لعام 2030-2050.كم سيكون سعر MAS في عام 2030؟
نبذة حول MidasProtocol (MAS)
MidasProtocol هو بروتوكول يتم تشغيله على تكنولوجيا سلاسل الكتلة، وهو يعتبر عملة رقمية ذات أهمية تاريخية في عالم العملات المشفرة. تم تطوير MidasProtocol لتمكين المستخدمين من الوصول إلى الخدمات المالية المشفرة بسهولة وأمان.
تم تصميم MidasProtocol ليكون منصة شاملة تجمع بين محفظة رقمية آمنة وواجهة تداول سلسة وأدوات إدارة مالية فعالة. يمكن للمستخدمين الاستفادة من MidasProtocol لتخزين العديد من العملات المشفرة بطريقة آمنة وتنفيذ عمليات التداول بسهولة وسرعة.
واحدة من أبرز ميزات MidasProtocol هي القدرة على توفير واجهة تداول بسيطة وسلسة وسريعة مع خدمات السوق العام. يمكن للمستخدمين الوصول إلى تقارير مفصلة حول الأصول المشفرة والاطلاع على معلومات السوق الحالية. كما يمكن للمستخدمين الاستفادة من أدوات إدارة المحافظ لتحقيق أداء أعلى وتنويع الاستثمارات.
بالإضافة إلى ذلك، يوفر MidasProtocol ميزة تأمين الأصول المشفرة بفضل الاحتفاظ بمفتاح خاص على الجهاز الذي يستخدمه المستخدم. هذا يعني أنه ليست هناك حاجة للمخاطرة بتخزين مفاتيح الوصول عبر الإنترنت.
تعد MidasProtocol بمثابة نقلة نوعية في عالم العملات المشفرة من خلال توفير منصة شاملة للمستخدمين لإدارة وتداول أصولهم بطريقة آمنة وفعالة. بفضل واجهتها السهلة الاستخدام والميزات المتعددة، تعتبر MidasProtocol وجهة أساسية للمتداولين والمستثمرين الذين يرغبون في الوصول إلى عالم العملات المشفرة بسهولة وثبات
رؤى Bitget
ماذا يمكنك أن تفعل بالعملات المشفرة مثل MidasProtocol (MAS)؟
الإيداع بسهولة والسحب بسرعةاشترِ لتنمو، وبع لتربحالتداول الفوري للمراجحةتداول العقود الآجلة للمخاطر العالية والعائد العالياكسب دخلًا ثابتًا بمعدلات فائدة مستقرةتحويل الأصول باستخدام محفظة الويب 3 الخاصة بكمعلومات عن MidasProtocol وآلية عمل MidasProtocol
شراء المزيد


الأسئلة الشائعة
ما السعر الحالي لـ MidasProtocol؟
ما حجم تداول MidasProtocol على مدار 24 ساعة؟
ما أعلى مستوى على الإطلاق لـ MidasProtocol؟
هل يمكنني شراء MidasProtocol على منصة Bitget؟
هل يمكنني تحقيق دخل ثابت من الاستثمار في MidasProtocol؟
أين يمكنني شراء MidasProtocol بأقل رسوم؟
أسعار العملات المشفرة ذات الصلة
أسعار العملات المُدرجة حديثًا على Bitget
العروض الترويجية الرائجة
أين يمكنني شراء MidasProtocol (MAS)؟
قسم الفيديو - التحقق السريع والتداول السريع!